I happened to deploy Azure api management to host some application recently. We needed traffic to be routed through out Azure subnets but the ‘Basic’ version doesn’t support v-net integration. (More on this in the later blogs)
Microsoft has recently released the Standard V2 for General Availability, for more information about is here
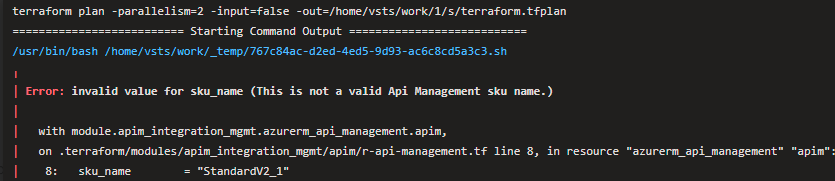
All excited to try this v2 tier. I deploy the infrastructure through azure devops pipelines. Terraform is the IAAC tool to manage the infrastructure. While trying to deploy the new version, I got the following error,
Going back to latest documentation, here, StandardV2_1 is not in the below list.
sku_name – (Required) sku_name is a string consisting of two parts separated by an underscore(_). The first part is the name, valid values include: Consumption, Developer, Basic, Standard and Premium. The second part is the capacity (e.g. the number of deployed units of the sku), which must be a positive integer (e.g. Developer_1).
Terraform is yet to catch on the latest release and allow standardv2 sku to be deployed.
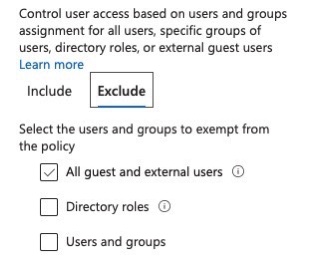
Essentially what it means is that conditional access policy will apply to legacy application by default
If you must use legacy authentication, you must exclude those accounts from the policy, you can do this under Azure AD -> Security -> Conditional Access -> Open an Existing policy that you have -> Under Users and groups -> Exclude
(or)
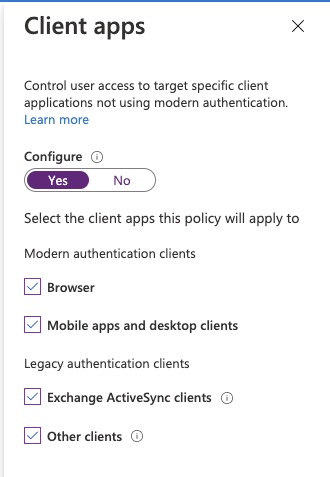
2. Configure CA only for Modern application,
You can do this under Azure AD -> Security -> Conditional Access -> New policy (or) Open an Existing policy -> Under Conditions -> Client apps, Uncheck the Legacy authentication
Note: This recent announcement from MS only applies to new CA, existing CA will continue to work as it is.
At time there are times when users ask the same question over and over again. For example, how to reset my password or where can i find the latest communication and so on. Inspite having the information being published and communicated user tend to ask service desk on how to do stuff. Service desk handling these request could focus on something better if a person answer repeated and known issues just typing on Teams chat.
Azure is getting bigger and better, now it is possible to have someone answer those question within a minute.
So how to do that?
Azure bot service helps to achieve that. There are tools which can help you build it from scratch without typing a single line of code.
Click on ‘Create a knowledge base’, this is the place where you start. Any further changes to the existing knowledge base is under ‘My Knowledge bases’
Click on “Create a QnA service” to start creating a conversation question and answer layer
This will take you to Azure portal, fill in the details. After filling out this form, you are essentially creating
Azure Search – This is used to index the data (You can choose free. It can indexes upto 3)
App Service – This host as a runtime. This is the compute engine (it is on standard service S. You can change this from app service portal to F1 which is free)
Note: You can choose Pricing Tier as ‘F0’ which is free. I’ve used up mine, so that is grey out.
Once you create, you are back to QnAmaker.ai
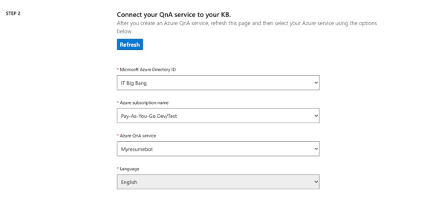
Step 2, is to connect to QnA service which we just created
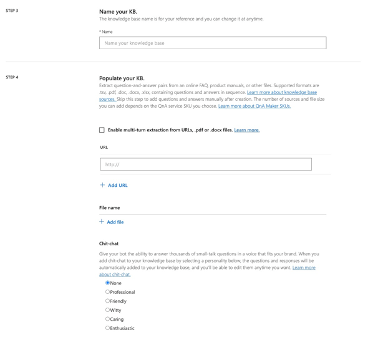
Next step is to Name your Knowledge base and feed in the knowledge. This is very nicely built and very user friendly. Here is my reason,
All you have to do is to upload them or if you have a website which has the FAQ, you can simple type in the URL. You don’t have to type FAQ all over again.
If you type in the URL which has the FAQ listed, QnA maker automatically render through he website and extract FAQ from it. You can add multiple source
Finally, you can define a character to your bot. You can have a bot who respond professionally or friendly
Finally, you click the Create your KB
There you go, you get place where you get to see all your questions and answers. You get to add/remove/modify question. Depending on the type of customer you can modify the KB. You can come back any time to update/remove items. You can hand over this task to team who can manage this for you.
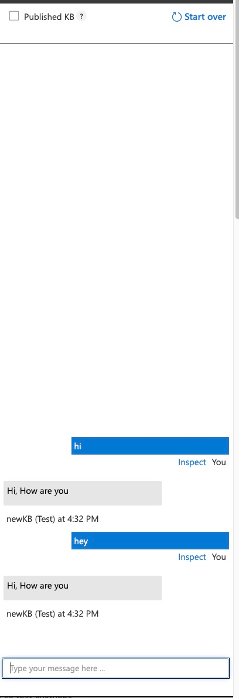
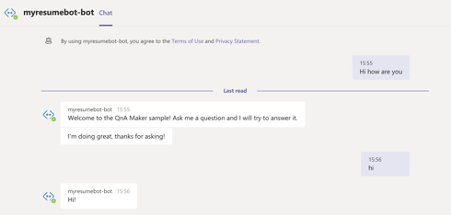
So, you can do some testing to see how your bot respond. Click ‘Test’ button on the top right corner and chat
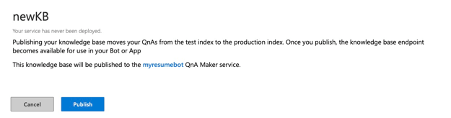
All you have to do now is ‘Publish’ it. Click the publish button on the top right corner
Click publish,
Now, Click Create Bot
This will publish the bot to Azure. You need to verify the details
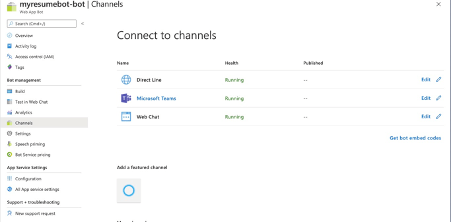
You can now navigate to Azure bot service to find it is list there. Now you need to use this bot in to your channel. Channel is the place where you interact with the bot.
I’m going to connect my Teams. Navigate to Channels, under Bot management
After you connect your teams, just click on Microsoft Teams, (if you are signed in it will connect to your Teams automatically)
You can back this as an app and upload to your apps in Microsoft teams.
There was recent advisory from Microsoft about when the default configuration are used, an elevation of privilege vulnerability exists in Microsoft Windows that could allow a man-in-the-middle attacker to successfully forward an authentication request to a Windows LDAP server
The $newcert object contains the generated self-signed certificate which is stored on your system certificate store in the CertStoreLocation location.
Steps to Install the Self Signed Certificate to your Active Directory Server which enables LDAPS:
Launch Windows Powershell on the domain controller as an administrator.
Run the following command to install your certificate and configure LDAPS:
Click the Test Connection, and you will see the result,
Connection to primary hostname/ip address 180.0.191.130 on port 636: Checking the IP address 180.0.191.130: The IP address has a valid format. The IP address is public. Execute the connection with the given parameters: Active Directory login completed
I’m sure most of the admins would have received an email from Microsoft saying,
“Starting June 1, 2020, Office 365 will begin retiring TLS 1.0 and 1.1. This means that all connections to Office 365 using the protocols TLS 1.0 and TLS 1.1 will not work.“
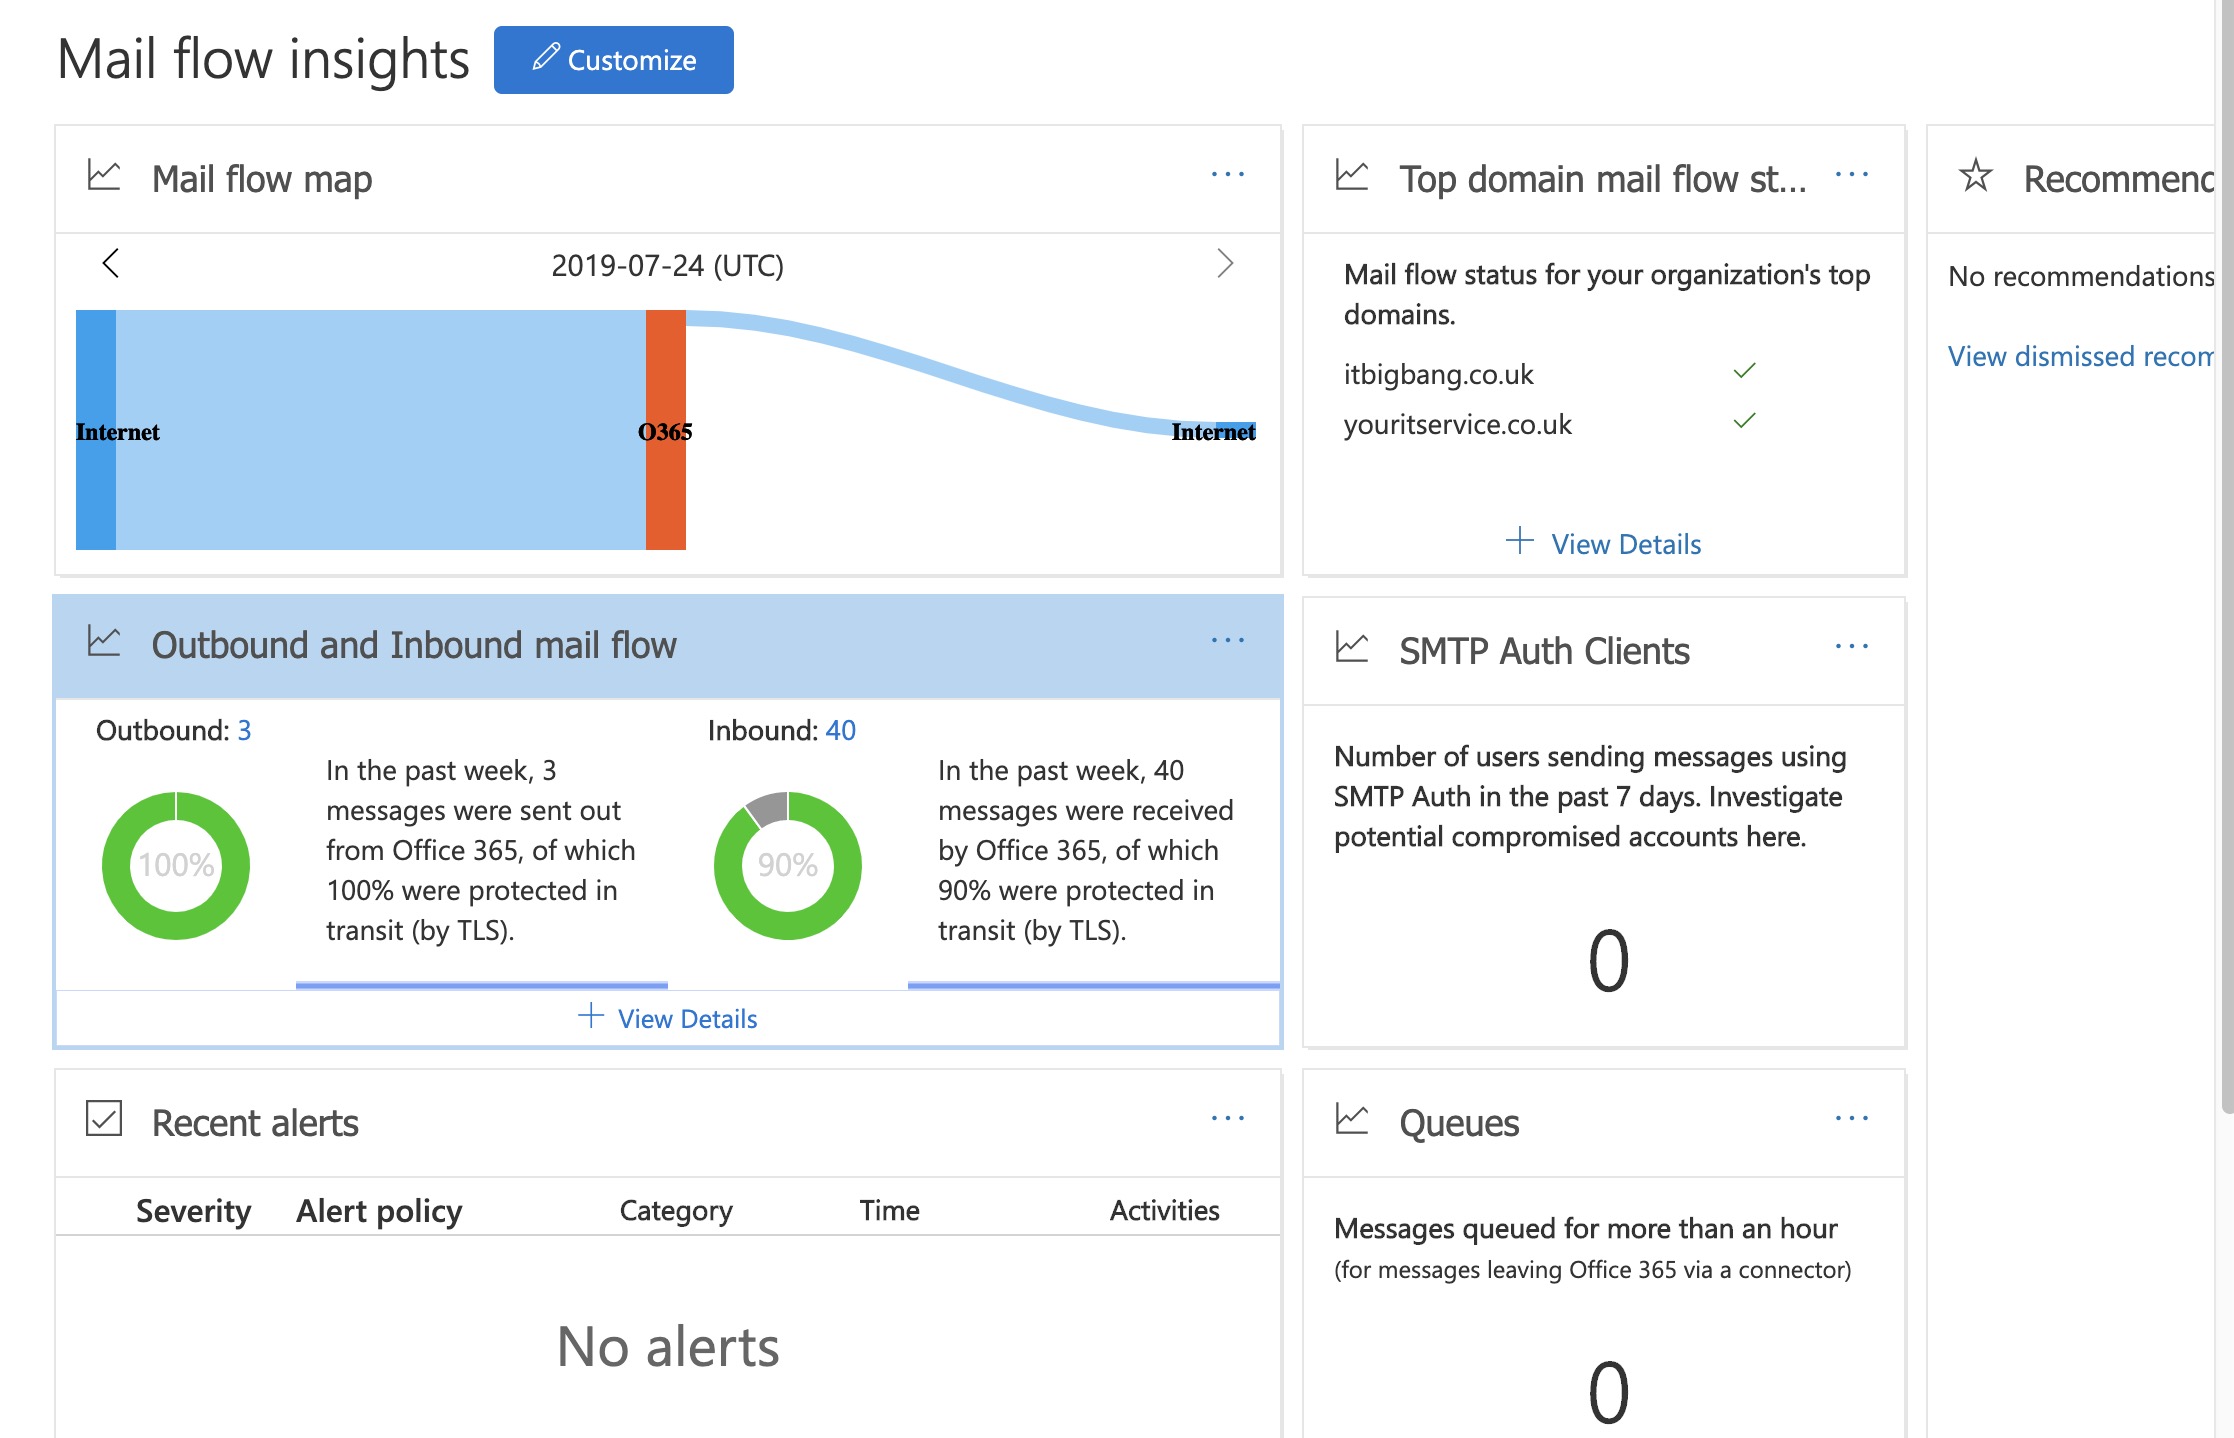
Some of my clients asked me on how to find if they even using TLS 1.0 on any of their system. So here’s how you can check from different tabs.
2. Click “Outbound and Inbound mail flow” – This shows summary of incoming and outgoing email.
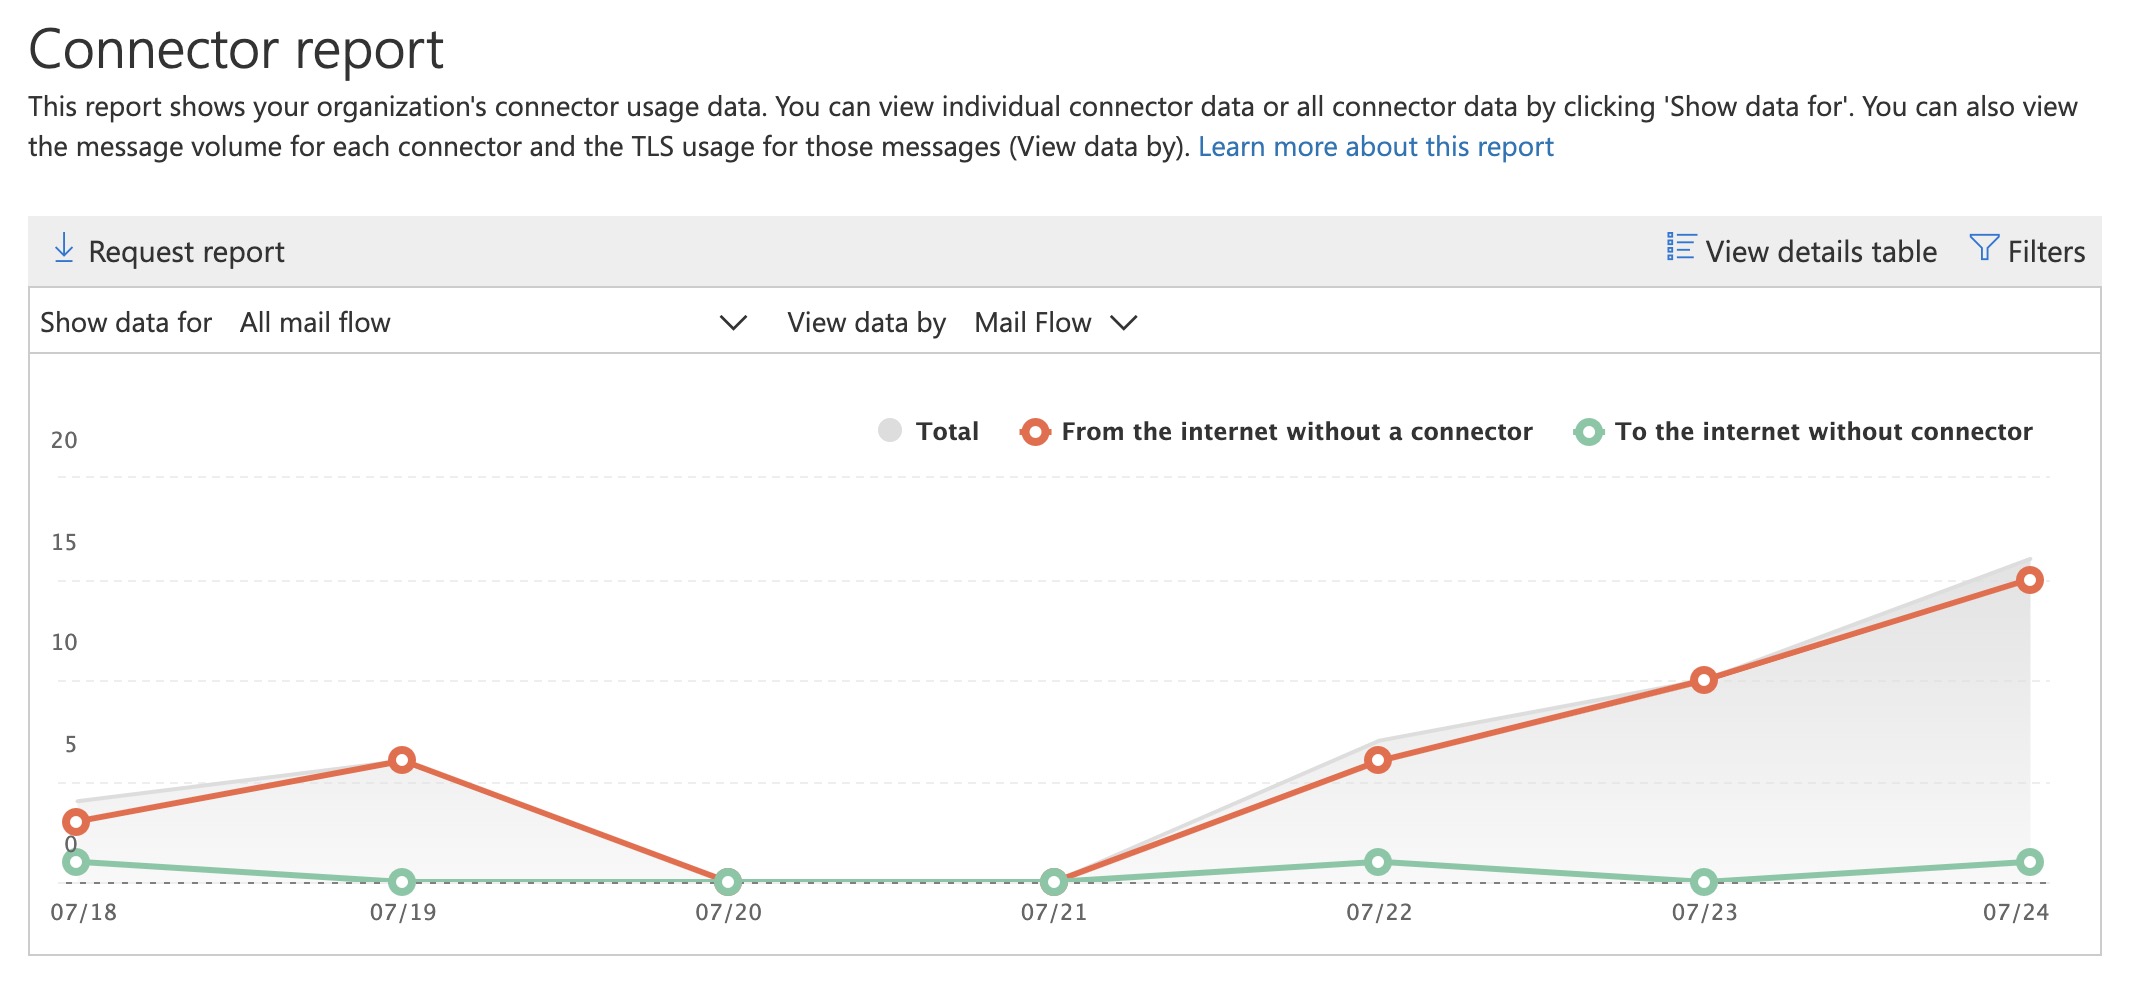
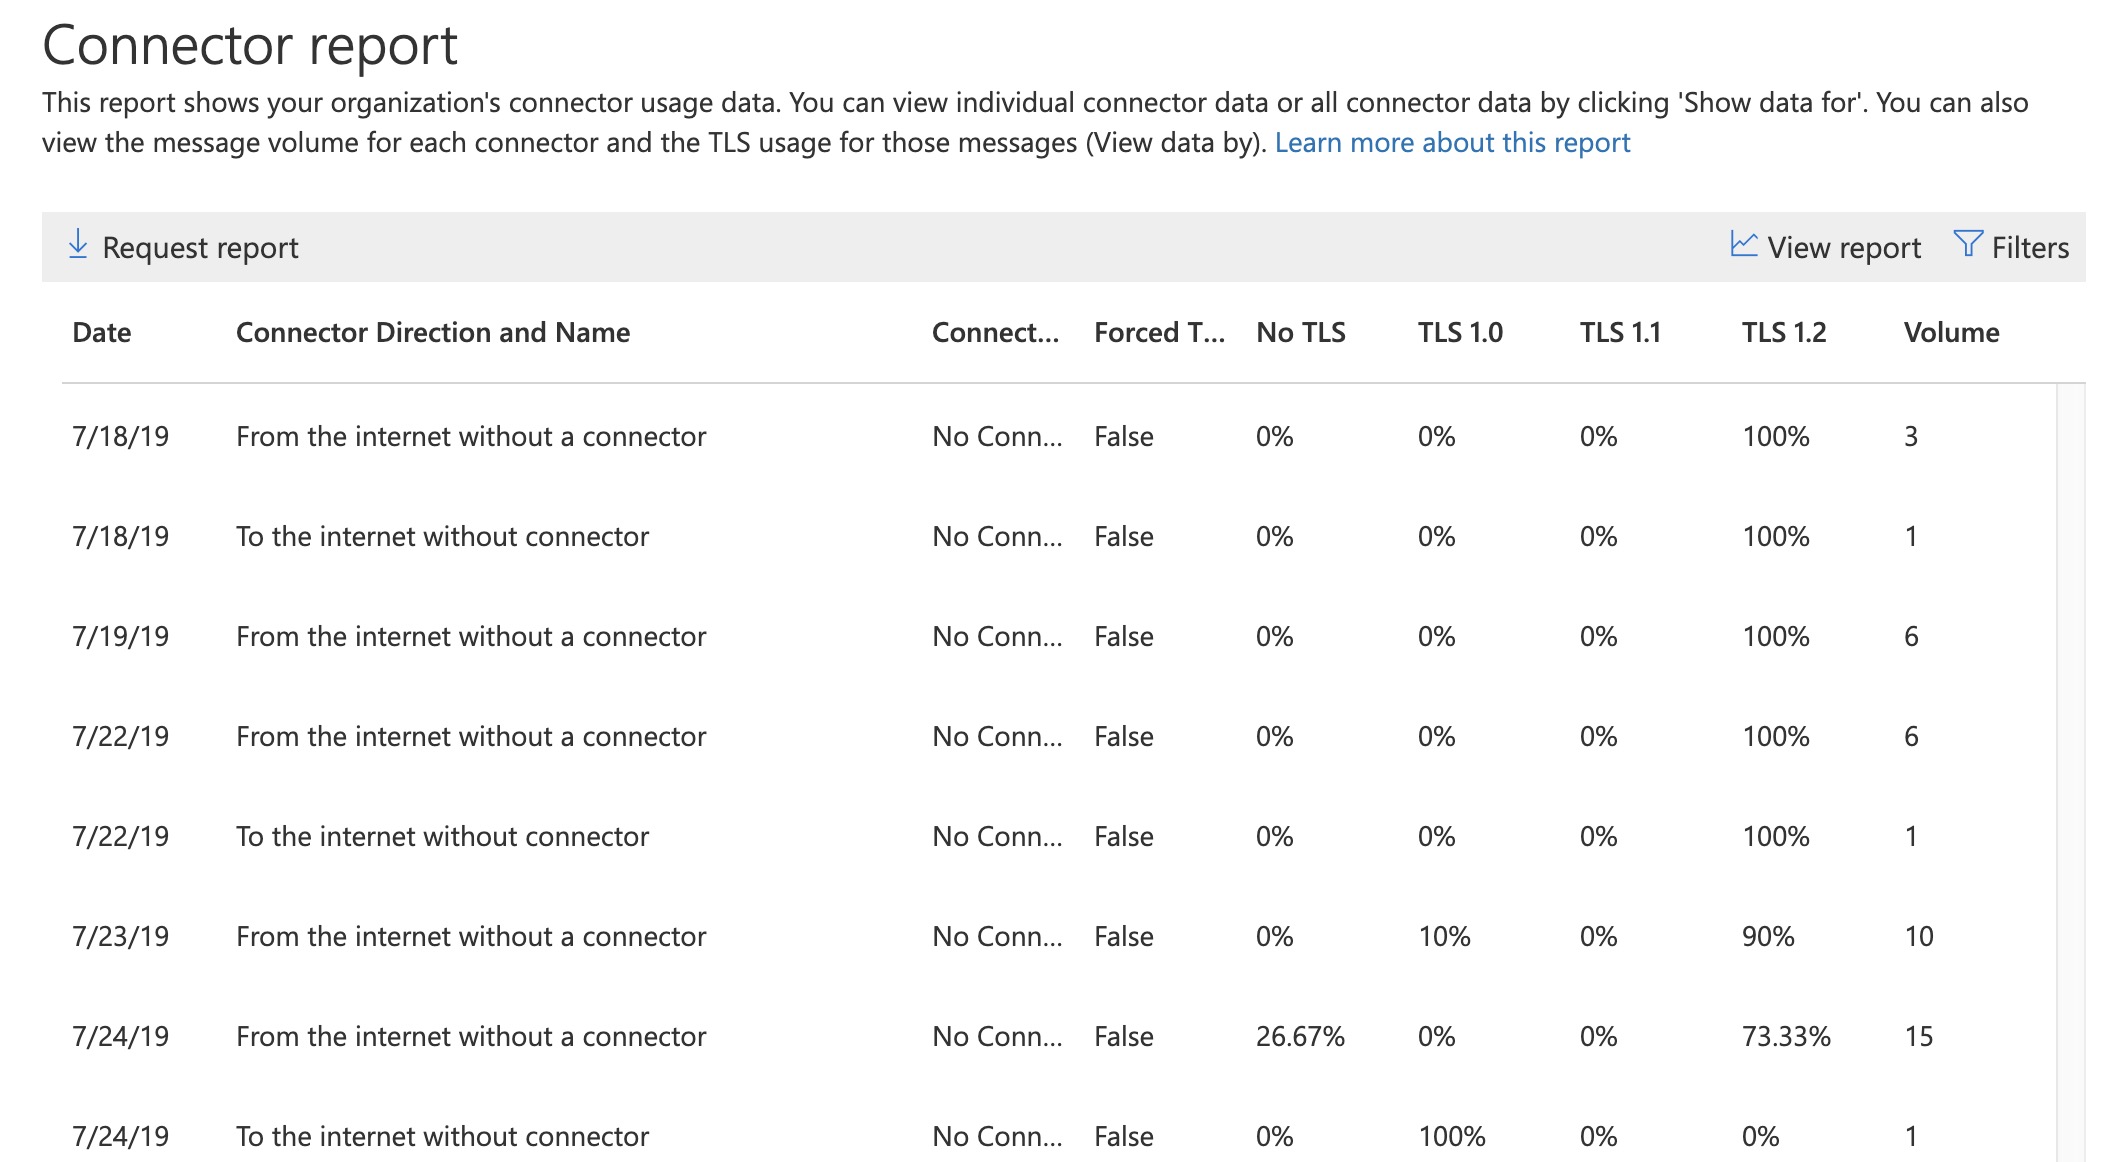
3. Click “Connector Report” to know which connector is sending on what version of TLS
4. If you click on Click ‘View details pane’ then ‘Request report’ (for detailed report) directed to internal user: this will show you the actual emails and the TLS version.
There are few runbook in gallery which helps to schedule shutdown and reboot of Azure VM but they no longer work or for Classic Azure. Microsoft has given a easy way to implement this without having to learn any scripts.
Although Microsoft document explains on how to set Start/Stop VM under automation account, it is little vague for me and i found some Admins struggling to follow it. So i thought i can try and make that simple
The most sorted scenario is to schedule a Azure vm shutdown and reboot during off business hours or weekends. So i’ve implemented that solution through Azure automation.
To Start/Stop VM automatically to save cost, you need
OMS workspace
Automation account
If you don’t have them already, you can create them on the way of creating this VM reboot schedule.
Login to your Azure portal
Search for Automation account, Click ADD
I’ve named it as Start-StopVM and I have choose UK South, Make sure you say ‘Yes’ to Create Azure Run As Account (this will avoid complications to your reboot process)
Under the automation account, Look for
Start/Stop VM
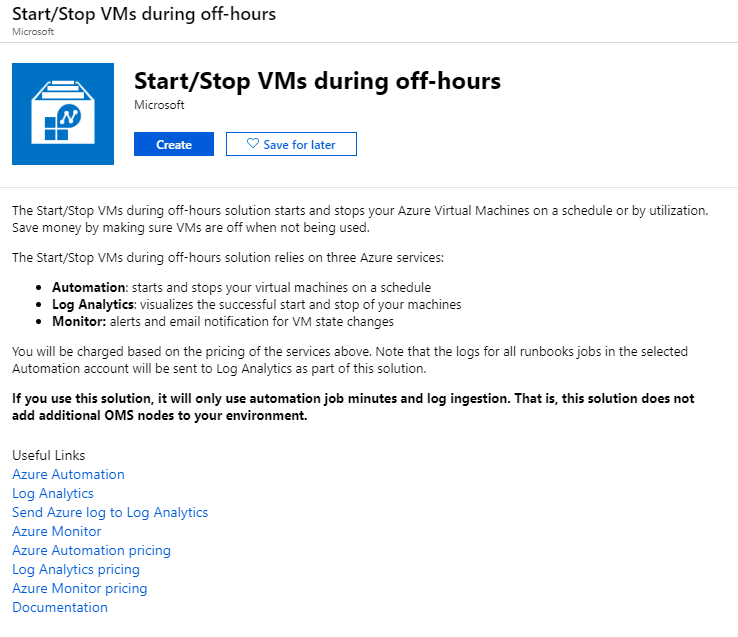
Click on “Learn more about and enable the
solution”
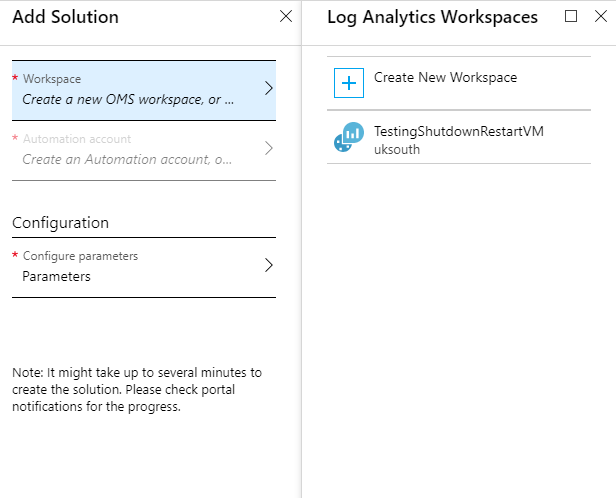
Once you choose to “Create”, you need to fill the following information. If you don’t already have OMS workspace, then you need to create one.
Workspace – TestingShutdownRestartVM
Automation Account – Start-StopVM
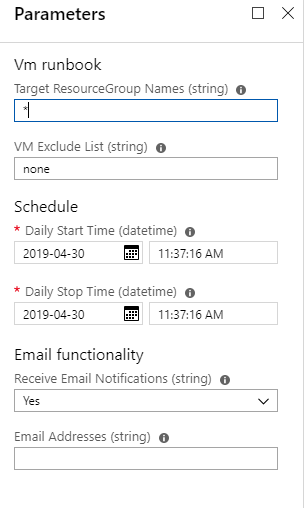
Under configuration,
Target ResrouceGroup Names – *
VM Exclude List – None
Note:- The resource group and VM Exclude List can be setup here, but since we wanted to reboot one or group of VM, leave this as it is.
Schedule current date/time
Email functionality – if needed ‘Yes’ and email
address to receive the alert
Click Create
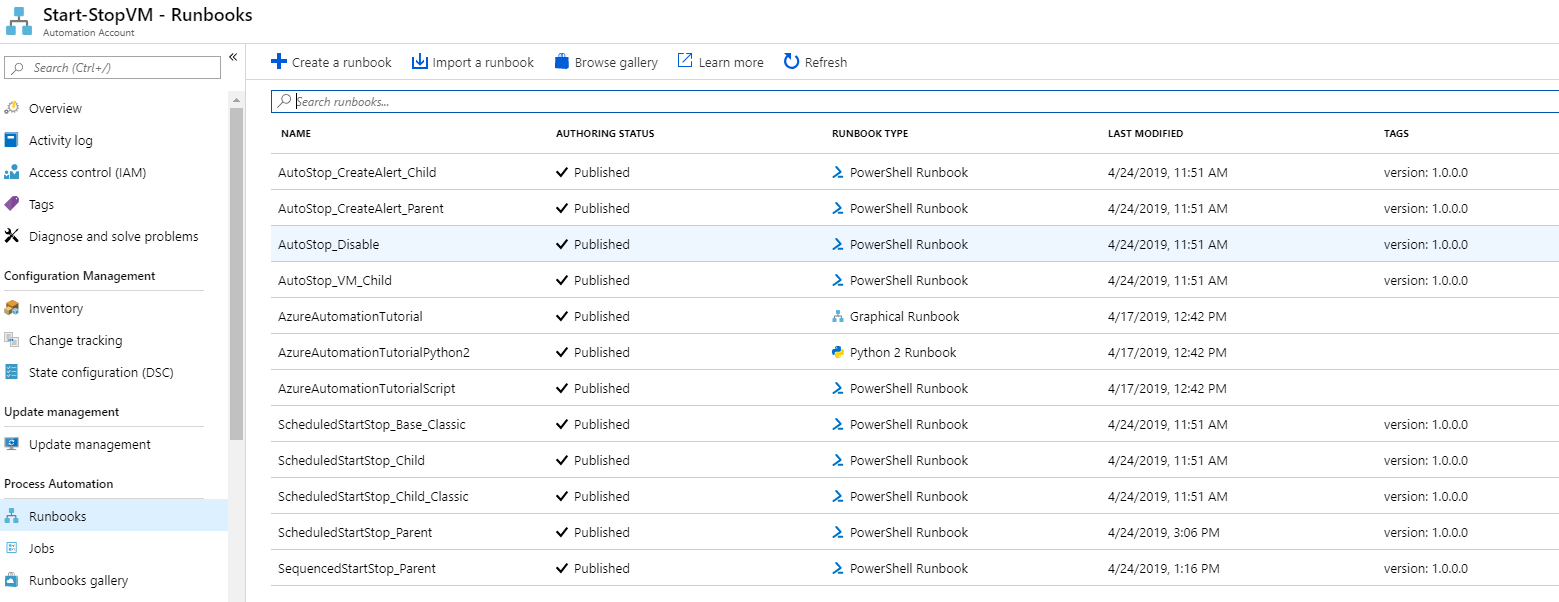
Once you do that, you will see list of Runbooks
added to the automation account,
This is the place where we are going to customize, the following things
List of VM’s or VM needs to be rebooted
Schedule in which the VM needs to be rebooted
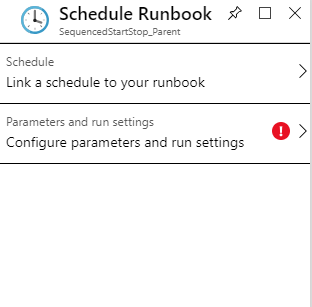
Click SequencedStartStop_Parent runbook -> Click Schedule and Click ‘Add a Schedule’
Click Schedule – Create a new Schedule, (I’ve named it as Sequenced-StartVM and Sequenced-StopVM and used it already under the schedule). You can customize the settings later if you want. Choose recurring if you want the start to happen every week, month, hour or Day.
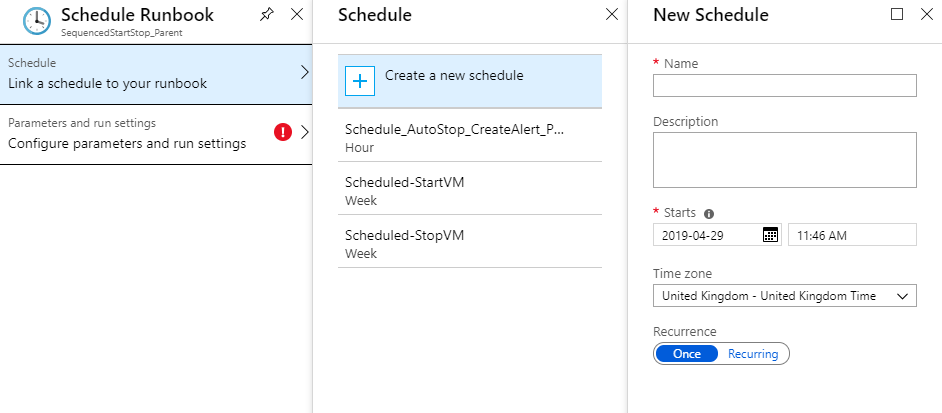
The following is the place where you define the action and list the vm or vm’s
Action – Start
WhatIF – $ture or $false ($true, if you are testing)
ContinueOnError – $true
VMList – List the vm’s or vm (you can use , to add more than one VM)
Do the same thing again to Stop the VM. (I’ve named
it as Sequenced-StartVM and Sequenced-StopVM
and used it already under the schedule).
Note:- Remember this schedule is for “Runbook” not for Automation
account.
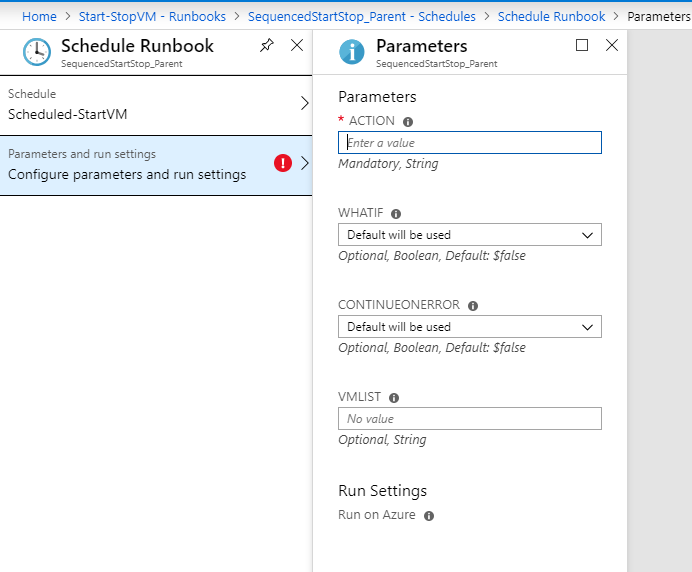
After you have finish configuring,
it would like this under schedule.
Note:- The parameter cannot be changed after you schedule them. The schedule can be changed. If you’d like to remove/add/modify VM’s, you need to create a new schedule
My schedule is to stop the VM on Friday
night 8:00 PM and Start the VM on Monday morning 8:00 AM
If you go to automation account -> Runbooks
-> SequencedStartStop_Parent -> Jobs
You can go in to this log to find out what
happened during the stop and start process.
Sometime early last year Microsoft announced that Global peering is Generally available, that opened lot of possibilities.
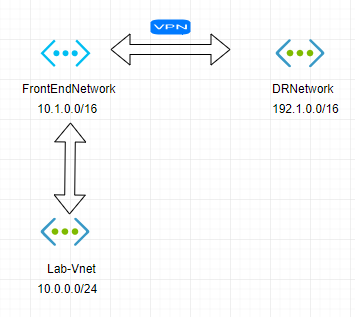
One of the requirement that my client want to replace their existing VPN with Global Peering between UK West and UK South without using a Third party appliance to route the traffic.
The existing network looks like this,
FrontEndNetwork & Lab-Vnet are in UK West, DRNetwork is in UK South. Since they are in different region, there is a VPN between FrontEndNetwork and DRNetwork
There are 2 requirements,
To replace VPN with Global Peering
To make sure Lab-Vnet traffic to DRNetwork should be routed through FrontEndNetwork
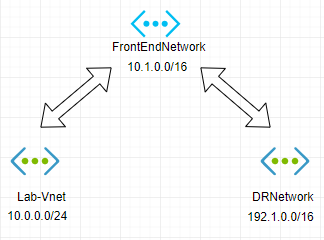
The network should look like below.
There are few things that we need to achieve this goal.
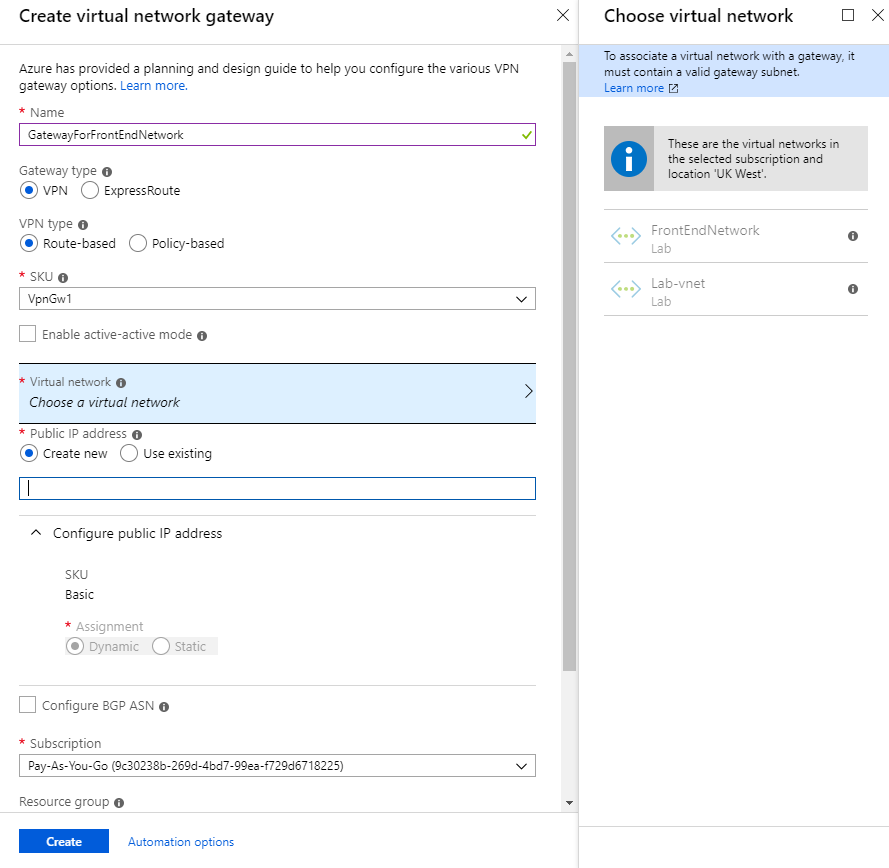
1.Virtual Gateway subnet for FrontEndNetwork – That is subnet where all the traffic from Lab-Vnet to DRNetwork and viceversa should land.
2. Virtual Network Gateway for FrontEndNetwork – This is the ip address used by Lab-net and DRNetwork
3. Route Table, one for Lab-Vnet and One for DRNetwork
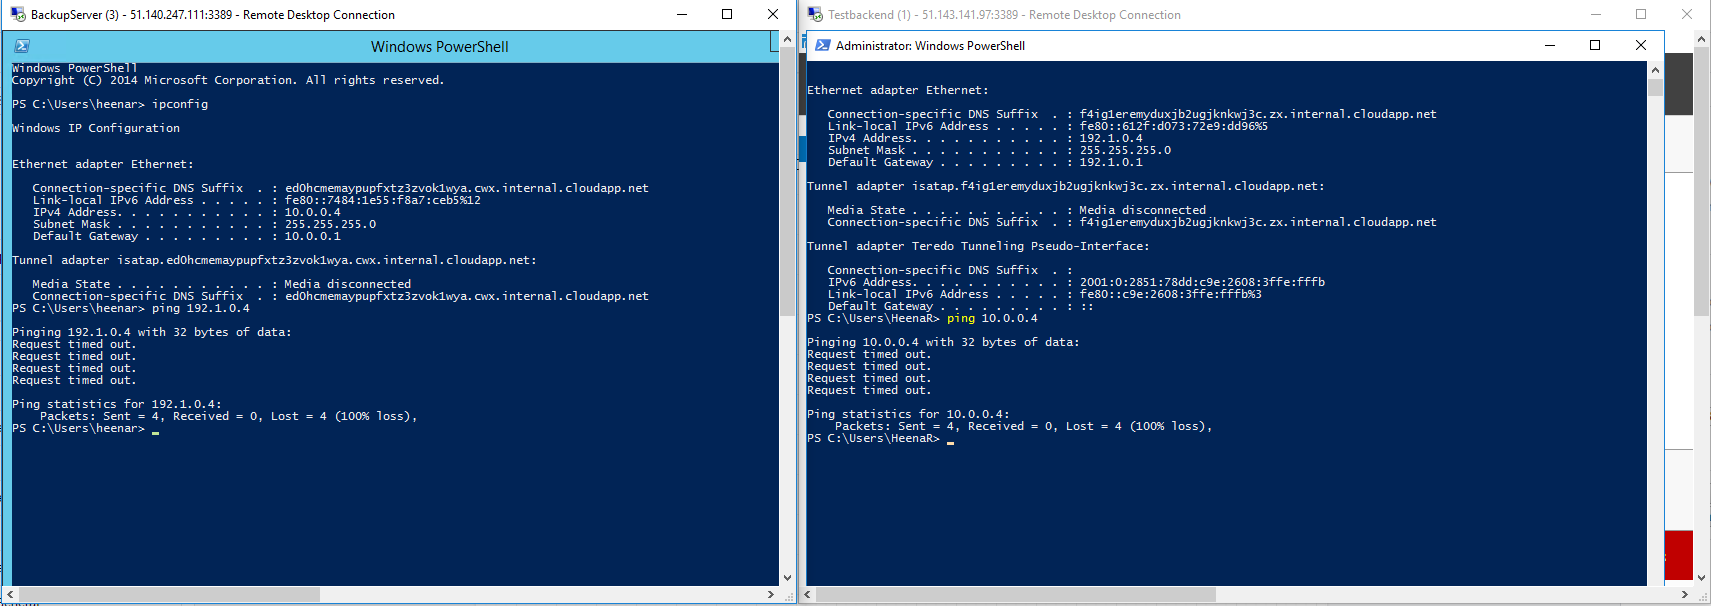
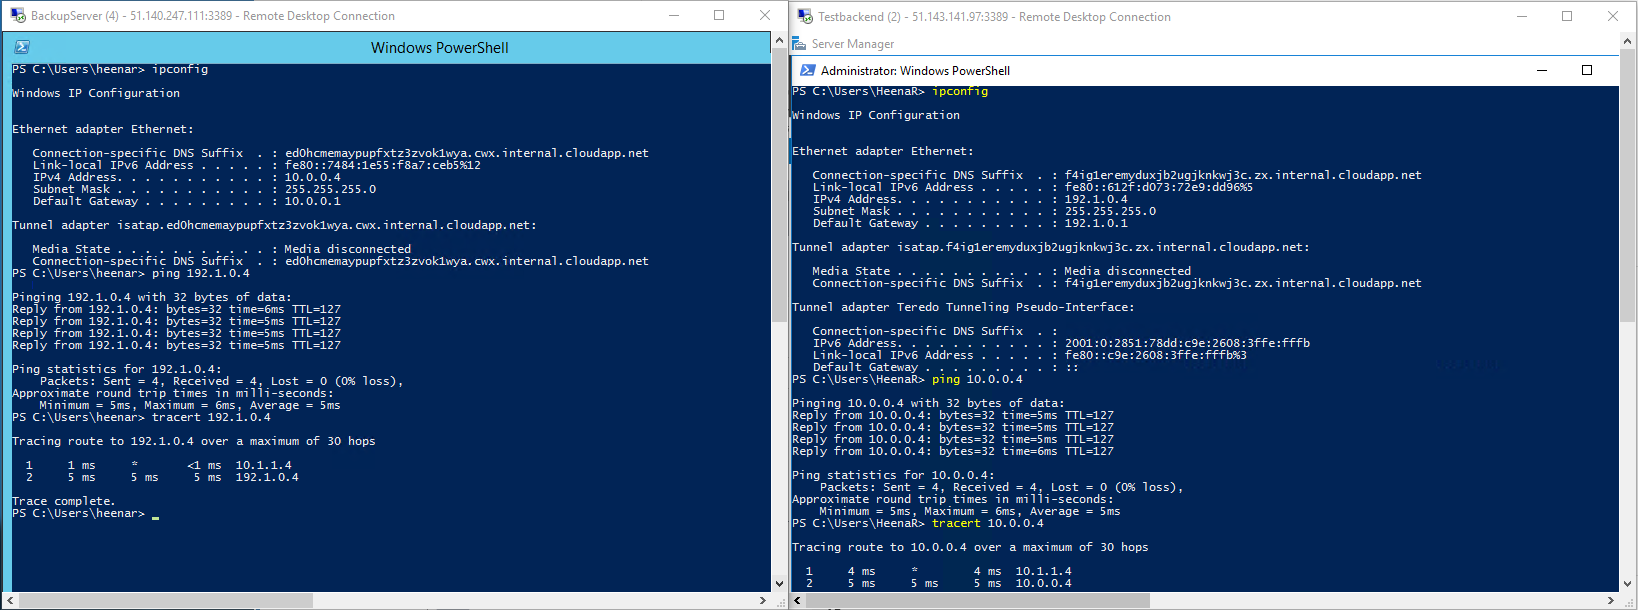
Before the implementation, i want to demonstrate the 2 vms on 2 different network doesn’t communicated with each other. The virtual machines are
TestBackEnd – 192.1.0.4 from DRNetwork
BackupServer – 10.0.0.4 from Lab-Vnet
Implementation,
Along with the 3 steps above, i’d like to show the peering between each network before we start creating other things.
Peering
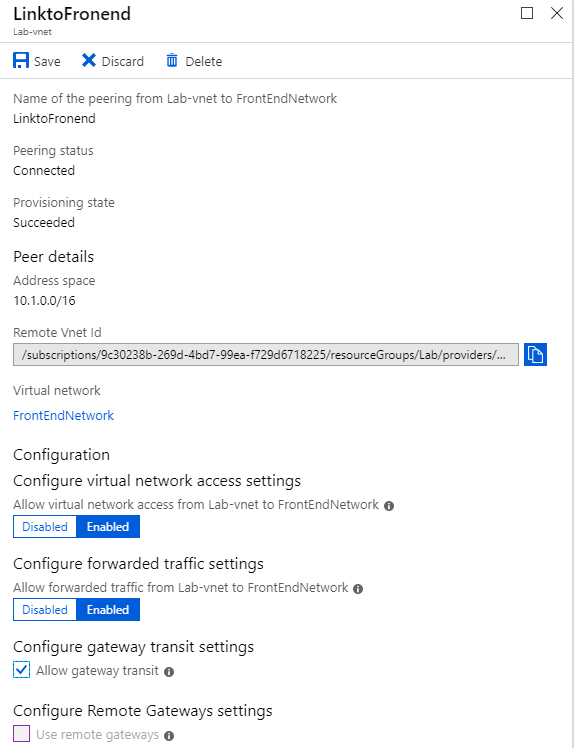
Lab-vnet to FrontEndNetwork, from Lab-vent virtual network
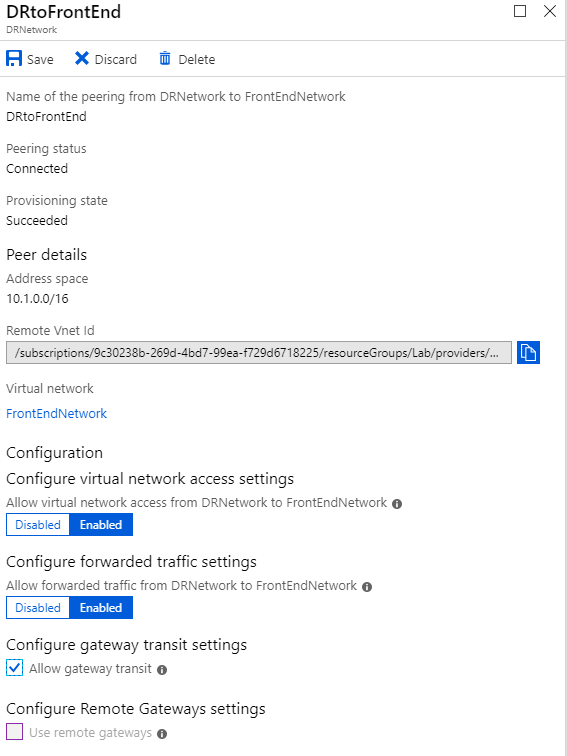
DRnetwork to FrontEndNetwork from DRNetwork virtual network
Note: I have chosen “Allow Gateway transit” for now, as we don’t have the Virtual Gateway subnet on FrontEndNetwork
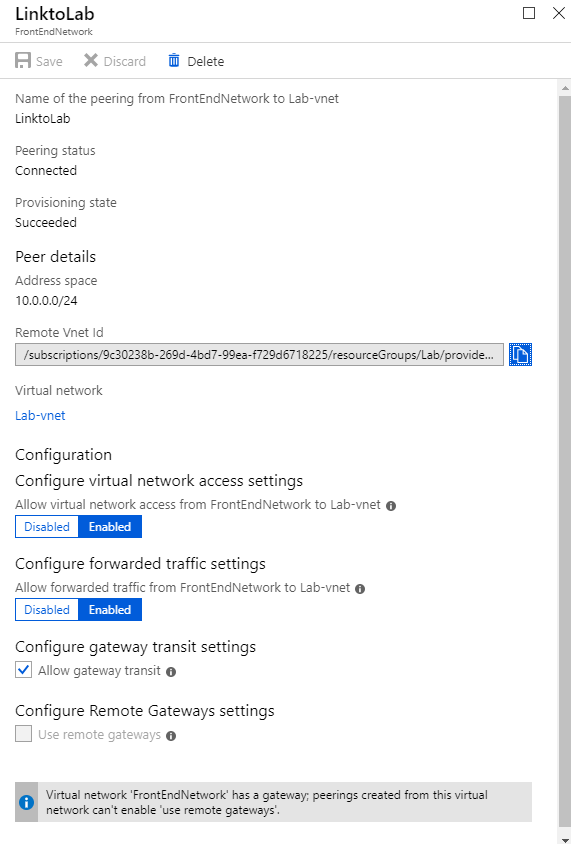
FrontEndNetwork to Lab-vent from FrontEndNetwork Virtual network
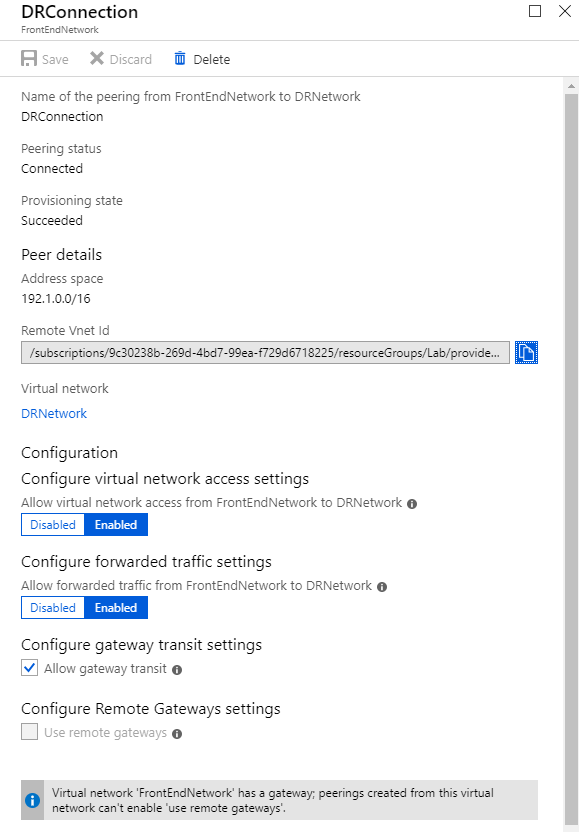
FrontEndNetwork to DRNetwork from FrontEndNetwork Virtual network
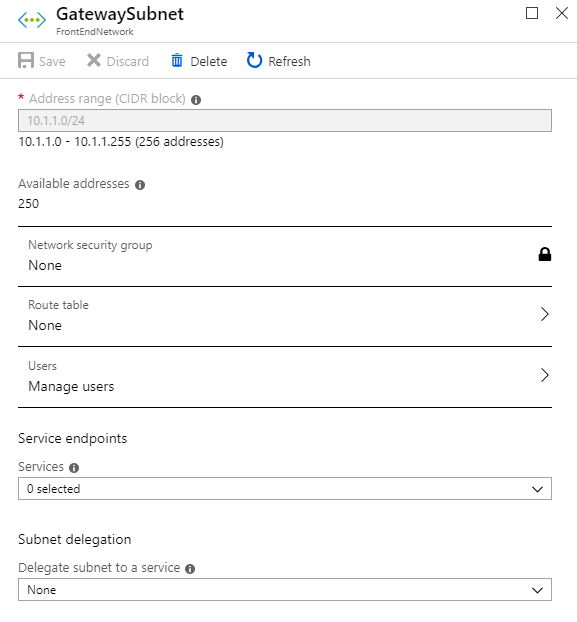
Creation of Virtual Gateway subnet
Navigate to the FrontEndNetwork
Click Subnets under Settings
Click “Gateway Subnet” on the right
Fill the details as below. The gateway subnet for my lab is 10.1.1.0/24
Creation of Virtual Network Gateway for FrontEndNetwork
Create a new Virtual network and associate to the FrontEndNetwork
Note: I can’t choose FrontEntNetwork because i’ve already created one for that subnet but you should have option to choose the V-net, if not check the region to make sure virtual gateway and Vnet are in the same subnet
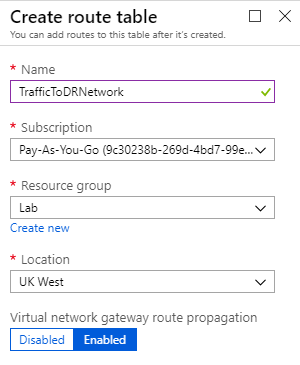
Creation of Route table
Search for Routing Table,
Create a new Route Table. I’ve filled the following information,
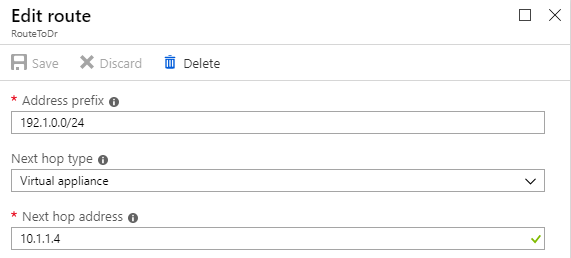
Go to TrafficToDrNetwork Route table, Click Configuration and fill in the following information
Note: i’ve filled the next hop address as 10.1.1.4, this is the gateway subnet address for FrontEndNetwork. Usually Azure assign the 4th address as the gateway address by default.
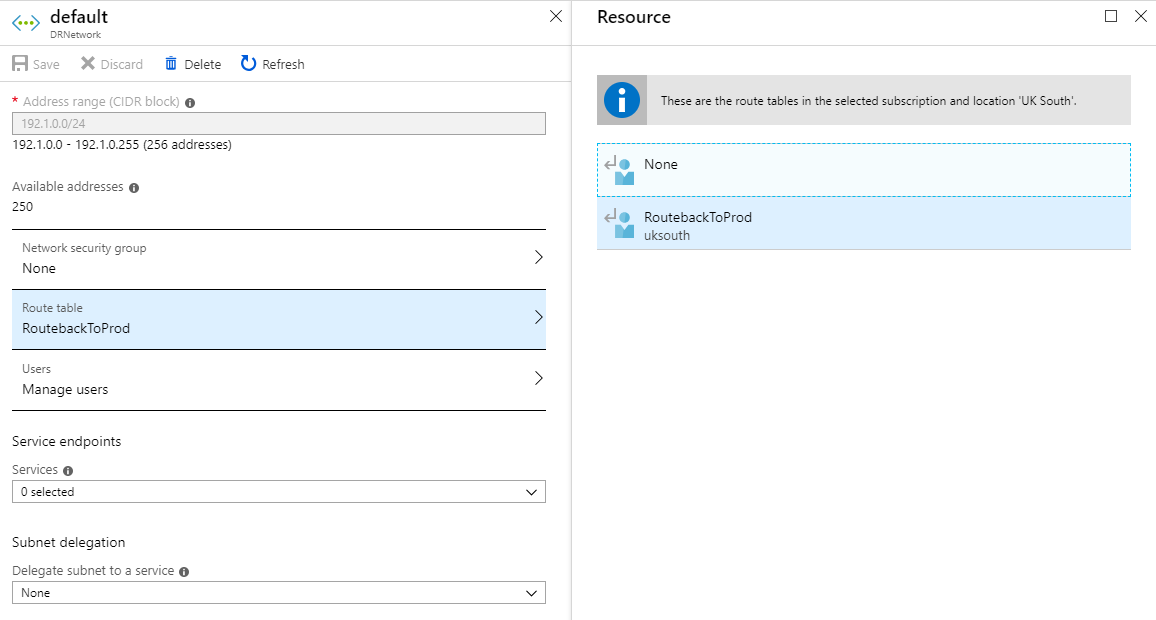
Assigning Route table to LAB-Vnet and DRNetwork
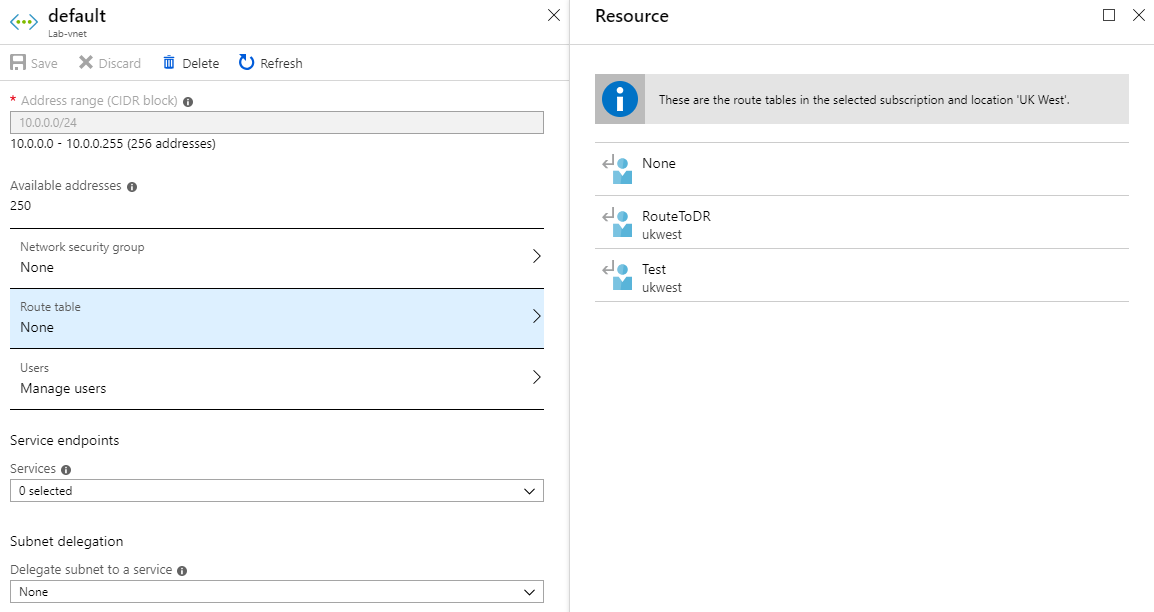
Navigate to Virtual Network – LAB-Vnet
Click on the subnet that you want to route the traffic to DRNetwork
Click on the RouteTable -> Choose the RouteTable that you have created through steps described above. In my case, Lab-vnet should send 192.1.0.0/24 traffic to 10.1.1.14 (RouteToDR)
Assigning Route table to LAB-Vnet and DRNetwork
Navigate to Virtual Network – DRNetwork
Click on the subnet that you want to route the traffic to Lab-Vent
Click on the RouteTable -> Choose the RouteTable that you have created through steps described above. In my case, Lab-vnet should send 192.1.0.0/24 traffic to 10.1.1.14 (RouteToProd)
Before you start testing, go back to Lab-vnet and DRNetwork, Make sure the peering with FronEndNetwork is “User Remote Gateway” is checked under “Configure remote gateway settings”. You dont have to do anything on FrontEndNetwork peering.
Once you have saved the settings, you should be able to ping. If you run the Tracert you can see that it is going through 10.1.1.4
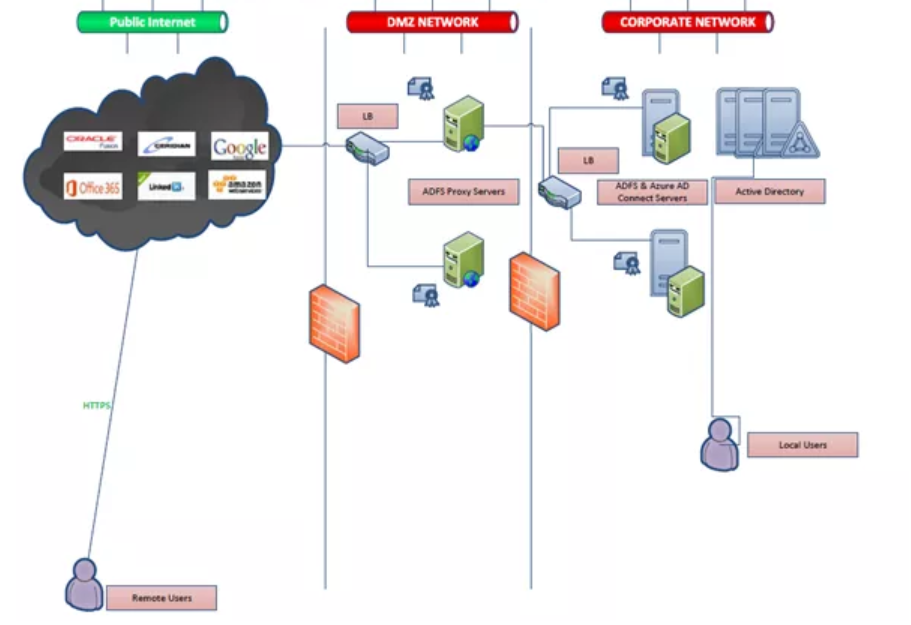
What happens when your Token Signing Certificate is about to Expire and how you can recover from the situation.
The infrastructure is similar to the following,
Successful Authentication flow,
Application Authentication page -> Redirects to ADFS Sign page – > Users enters the username and password -> Credentials is validated by ADFS server with the Identity provider -> Issues a SAML token back to the User on Successful verification -> User is then redirected back to the application page with a successful sign in.
SAML failure
The flow works until the SAML is being issued to the web page but Application will fail to validate it with an error message SAML_RESPONSE_INVALID
Token signing certificate
Some application responded may respond with the error SAML_RESPONSE_INVALID or some of them just ask the user for the credentials.
At this point we can confirm that SAML issued is invalid or wrong.
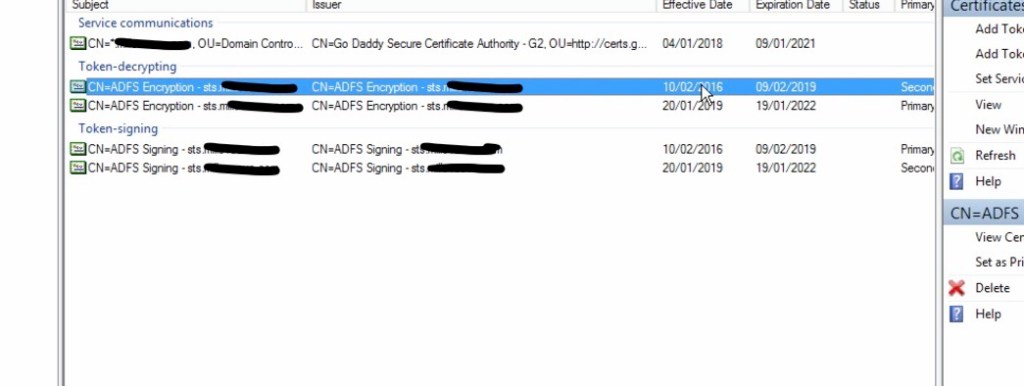
You might find on the internal ADFS servers Two certificates (Primary and secondary)
If your ADFS properties shows, (Get-ADFSProperties), the following
What happens is, The Token Signing certificate is set to auto-enroll exactly before 20 days of the existing certificate expiry date. After the generation of the new certificate, it automatically bring the new certificate as primary on the 5th Day.
As per the screenshot,
The certificate set to expire on 10/2/2019. 10/2/2019 – 20 days is 20/1/2019 as per AutoCertificateRollOver ADFS property. On 20th certificate got renewed as per CertificateGenerationThreshold Property. 20/1/2019 + 5 Days, the certificate switch happened as per CertificatePromotionThreshold.
Solution:
Set the autoenrollment to false by running the cmdlet, Set-ADFSProperties -AutoCertificateRollover $False
From ADFS Console, choose the old certificate as primary by “Set as primary” (“Set as Primary” option is disabled until first step is completed)
If you have issues in connecting to your office 365 mailbox through your outlook, or some of the users complaining issues with their outlook, then you are not alone.
Seems there are few customers affected with Exchange online services, Microsoft is working on it.
If you have issues with Azure MFA, then you are likely affected due to issue caused by Microsoft. Please check your message center in office 365 to confirm or call Microsoft.
This has been resolved completely. If you still face issues then it’s time to log it with Microsoft